|
Makeup makes you beautiful so what about makeup that is beautiful? (Although you don't need makeup too look flat-out fabulous ;) I'm a sucker for pretty packaging and lovely products, but what about you? View the slideshow below, and have a lovely day! xoxo 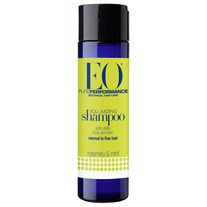 One of the most invigoratingly scented shampoo's on the market! One of the most invigoratingly scented shampoo's on the market! Hello! Today I'm going to share the basics of shampoo & conditioner, the thing in hygiene/beauty routines that gets left out the most.
PART I: Picking Out The Right Stuff This step is the most essential step in hair care. You can't just pick out the cheapest or most expensive thing, and assume it'll be perfect. Even pricey products aren't good all the time either! Always look at the ingredient list. Ideally, the best shampoo and conditioner would contain no sodium lauryl sulfate- the chemical that suds of shampoo, is organic, contains natural oils for cleansing, and is cruelty-free. That list can be a lot to live up to, so if you're looking for something like that, try searching for family owned or small brands. Dr. Bronner's, EO Organics, and Renpure Organics are all fabulous lines with the criteria stated above. If you're on a budget, Dr. Bronner's soap does everything- toothpaste, body wash, shampoo (use a conditioner after though), floor cleaner, and so much more! PART II: How To Wash Up Yup, I'm going to teach you how to wash your hair. Go ahead, scoff. But I bet you're doing it wrong. First, take a nickel sized amount of soap (and a grape or two for longer hair), and massage it into the top of your scalp with your finger pads, not your fingernails. Using the suds (suds can come from oils as well) brush them into the middle part of your hair, avoiding the ends at. all. costs. Then rinse with warm water! For conditioner, size will vary. For short hair, a dollop the size of a cherry will do. For longer hair, aim for the size of two to three raspberries. But before you apply conditioner, scrunch out water from rinsing out the shampoo. Apply conditioner on your ends and work your way up. Rinse out with ice-cold to regular cold water to seal in shine- believe me, it works. I hope this was helpful ^_^ Have a lovely day! xoxo Wow! It's been so long since I last posted a book review- I blame Doctor Who! Anyways, this novel was good but not good if you understand what I'm saying, but you probably don't. The writing was wonderful- absolutely wonderful, but the speed of the plot was not. The love triangle seemed old and tired, and not even vaguely intresting. Out of the Easy was a murder mystery, romance, and coming of age novel all wrapped up in one.
Stars: ★★ ★ ★ ☆ Set in 1950's New Orleans, the main character, Josie or "Jo" lives with her prostitute Mother, who couldn't care less about her. Josie's goal is to get away from her corruptive mother and go to a prestigous college far away from New Orleans. Working at a friend's father's bookstore to pay for her college leaves almost no time for fun, along with caring for her friend's father. She wasn't very relateable to me, but I could sympathize with her struggles. I would say the main conflict is Josie's mother, who provides lots of trouble for her, along with the abusive boyfriend she has. I would reccomend this book to fans of YA, historical fiction, and if you're looking for something deeper. Have a lovely day! xoxo Hello! Today I'm going to talk about stippling. First off all- what is stippling? It's become a big deal in the beauty community. Stippling uses a brush, like the one shown below. It has finer fibers near the end, which are usually white. Some popular ones are the MAC 187, E.L.F. Studio Stipple, and the Real Techniques Stippling Brush (which I use). 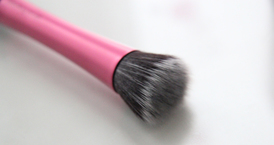 So, what do you need to stipple and how do you know if you're doing it right? Obviously, you'll need a stippling brush + foundation/bb or cc cream. Put an itty-bitty drop on the back of your hand and just dab the brush into the liquid. Then, you'll put some on your face with the brush- it will look very pixelated. Then you'll buff your face with brush, but only moving the white parts, like this. 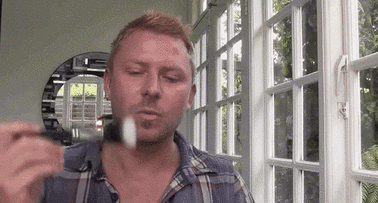 At the end, set with some powder, and you should have a flawless base for the rest of your makeup! Feel free to blend some of it with your fingers, since some foundation will still be left on your hand.
Have a lovely day! xoxo 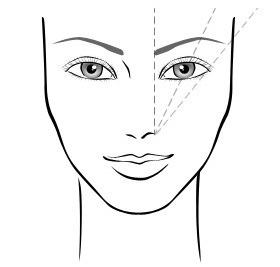 Hey!
Brows- they don't seem like much, just hairs on your face. Meh. WRONGGGGGG! They frame your face, and can seemingly change your bone structure (making your face longer, rounder, etc.) There are three main ways to get a basic brow shape- tweezing, waxing, or threading. I myself prefer tweezing, since I can touch up at home instead of having to go to a salon. However, before just picking groups of hair to rip out, you should know a couple things. 1. Figure out your face shape and determine your ideal brow shape. Remember though- thick brows are in! A good site to look at for this is Benefit Brow Genie. 2. Find your beginning, arch, and tail. Mark this with a brow pencil, on top and bottom. If not's in the marks that you've made, get rid of it. 3. It might hurt at first, so until you're used to the pain, you might want to pluck brows after a hot shower, or numb the area with an ice cube. Always moisturize! 4. Make a brow schedule. For example, I always tweeze my brows after my shower every Wednesday and Friday. To fill in your brows, keep check of your beginning, arch, and tail, then fill in the area with a brow pencil one shade lighter, and smooth them out with a spoolie brush, or you can substitute a matte eyeshadow. Have a lovely day! xoxo 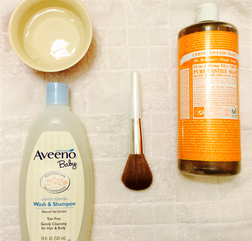 Since it looks like Weebly screwed up the original post, I am re-writing my post on how to clean makeup brushes- something you should be doing a minimum of once a week! You Will Need: Small Bowl Lukewarm Water Baby Shampoo Towel First, wet the tip of your brush with semi-hot water from your faucet, avoiding the part where the bristles meet the metal. If you do wet that part, the brush bristles are more succeptable to falling out. Next, swirl some baby shampoo into lukewarm water in a small bowl, or lather some in your hand. Gently massage your brush into the palm of your hand or swirl it around in the water! Now, dry off the brush (no heat aka hair-dryers) and re-shape the bristles. Since you will want your brushes to dry at an angle, dump out the water from your small bowl and flip it upside down- then place a towel over it. Finally, remeber to place your brush on the towel to dry- this might take 3-4 hours, so I reccomend doing this at night! 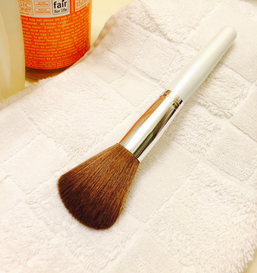
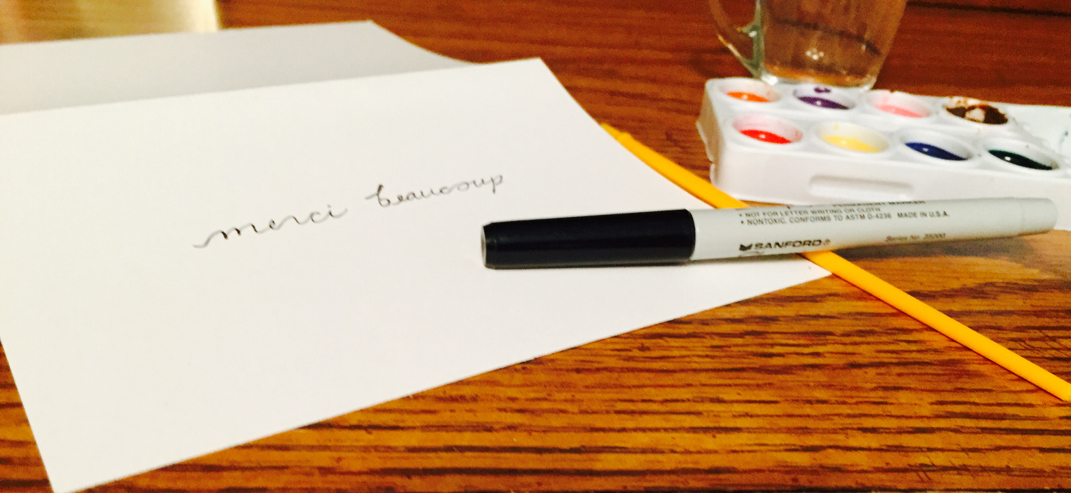 Today, I'm going to share how to make watercolor thank you cards! First, you'll need watercolors (duh), a small cup of water, a thin paintbrush, a fine Sharpie, and a plain card made out of cardstock. What you'll need to do is fill up the cup with water, and lay down the cardstock. Then you're done! JK, nope! You need to write whatever you want to on the cards (for the ombré-ish one I write merci beaucoup, and for the polka-dots, thanks/thank you in different languages). For the ombré, I used pink and red watercolors. It's not really ombré, but here's how I did it anyway- I made the color very deep at the edges and slowly lessened the saturation so that they "merged" in the middle, but they didn't, so I dabbled the two colors together. The polka-dots was more fun for me, and easier too! I just painted big circles of colors, and filled in the gaps with words. :D I hope you will like making these cards- I sure did! They're a very sweet way to show someone you appreciated their gift, and I love receiving cards, since people never send them out anymore. :'( Have a lovely day! xoxo 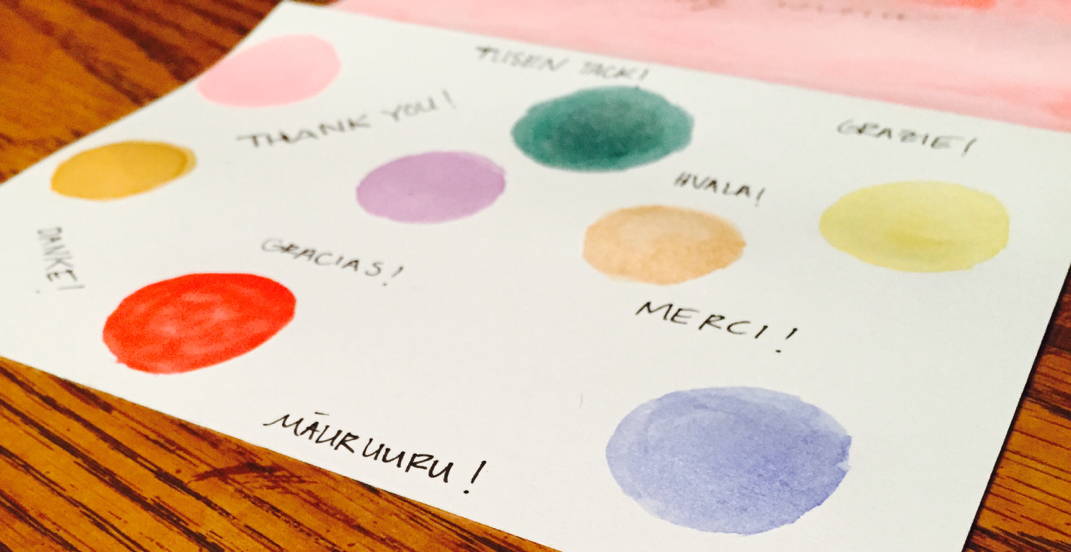 Hello! Today I'm going to share with you some basic ways to upgrade a basic dress to something with a little more spark! Every woman should know how to upgrade a dress- it's like a fact of life! Obviously, you'll need your relatively plain, solid color dress. Add a clutch- preferably in a punchy color or pattern, eye catching is a good rule of thumb. You'll need a bold lip; a deep, vampy red or a bright one- the choice is yours! Statement jewelry can be very cheap if you buy it from places like Forever 21 or a costume shop, you'll need a some, whether it's ear cuffs or rings! A blazer- shrunken, fitted, black, navy- whatever it is, put it on top of your dress because a) it can get chilly wherever you're going and b) it adds a professional touch to your ensemble. Sorry this post is so short, but I hope it was helpful! Have a lovely day, xoxo 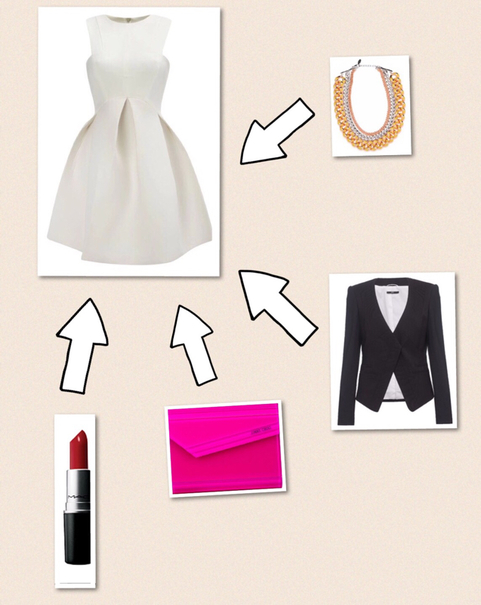 |
AuthorA nerdy girl who loves fashion and food! I will mainly blog about fashion and nerdy stuff, but I do tons of lifestyle posts. Archives
February 2017
Categories
All
Current Sponsor:None |
 RSS Feed
